

Here We’re getting hands-on with the brand new PS5 DualSense Edge controller. It has adjustable triggers and mappable back buttons, swappable thumb sticks, and some awesome software features that I will cover. Now, this is the first-ever official high-performance controller from PlayStation, and it has instantly become my favorite controller to use.
Note: This article contains Amazon affiliate links. If you make a purchase through these links, I may earn a commission at no extra cost to you.
Accessories

So, firstly, everything comes neatly packed inside this hard shell carry case, which immediately feels premium. There’s the PlayStation logo on the top, which is a nice touch, along with the little icons on the bottom and the zippers as well.

Inside, as you can see in image, we have the new controller along with all the accessories. These include two additional pairs of thumbstick caps: two high dome and two low dome, along with the standard caps that are on the controller already.
There are also two sets of back buttons, including the half dome and the two levers, which I will demonstrate in a minute. Then there’s a 2.8 meter braided USB cable, which feels great. It has a USBC on one end to connect to the controller and a USB-A on the other.
We also have a connector housing, which is used for locking the cable into the controller. Also, if you want to, you can actually charge your controller while it’s in the case. All you need to do is remove the little velcro padding on the back, feed the USBC cable through, and you’re good to go.
And all the accessories that we get with the DualSense Edge controller, which I think looks pretty impressive. There are loads of options here and replacement parts if you need them.
Design and Features

So, first impressions on the design and overall look of this controller: it looks and feels great. It obviously looks very similar to what we’ve seen already for the PlayStation 5, but it does feel heavier than I was expecting, not by much, but it is certainly not lighter.
Overall, it’s white with some nice black details, like the buttons, which are all black now and contrast nicely against the white controller. The touchpad across the top is now black rather than white, and if you look really closely, you’ll notice it has these tiny little PlayStation symbols embedded into it, and these look awesome.

You will have noticed this already, but the bottom part here is now glossy rather than matte, so I can see this picking up fingerprints and scratches quite easily. Although, I do like how the shape has changed very slightly. Then, underneath this, we now have two FN or function keys, and these are used to customize your buttons and profiles, which I will cover more later.

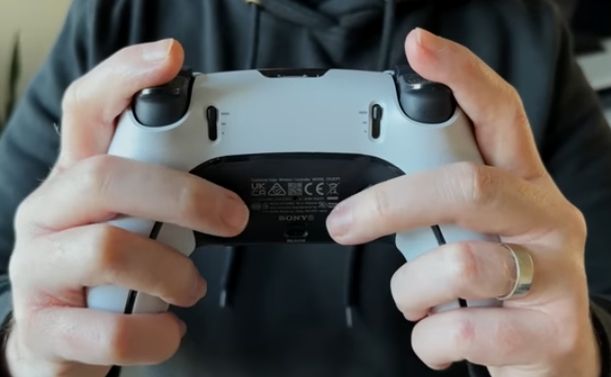
But around the back is where we see even more changes. The rear now has an enhanced slip-resistant grip, which feels more grippy and rubbery than before, meaning it’s less likely to slip out of your hand while gaming. Holding it, it definitely feels more comfortable in the hand. It also has these tiny PlayStation icons printed into the grip. Then, we have two big features on the back here: we’ve got the two holes for the RB and LB mappable buttons, and the trigger stops across the top.
You May Like This: PS5 DualSense Edge vs Scuf Pro Controller
Adjustable Triggers
So, for me, the adjustable triggers are one of the biggest advantages of owning a Pro Controller like this. Being able to change the trigger lengths can completely change the way you play certain games. By default, the triggers across the top work as expected, with a full range of travel and adaptive resistance.
The little PlayStation icons on the grip look and feel great. In games like Call of Duty Warzone 2, having a faster response time for pulling the trigger or aiming down sight could be the difference between winning and losing a one-on-one. Flipping the controller around and activating the trigger stops on the back will change the length of travel and fire the triggers quicker.
It’s not a mouse-like click, but it’s a noticeable difference when you play and can feel the shorter clicks. With three different lengths to choose from, you can find a perfect balance between instant and adaptive for each trigger. You’re not locked into one type of controller, as you can flip it back to normal for racing in Gran Turismo 7 and take advantage of the full range. These triggers have adaptive resistance built in, but flipping them down will disable this feature, as it makes sense for quick trigger firing.
Remappable Rare buttons

The mappable back buttons are a game changer for almost any game you play. On the back, there are two holes labeled RB and LB designed to be used as extra buttons for the controller.
It comes with two sets of buttons, the Half Dome and the Lever style, both made of metal and feel nice to the touch. Simply push them into the holes as labeled and you have extra buttons at your fingertips. For example, while playing Call of Duty Warzone 2, instead of moving your thumb away from the thumbstick to press jump, you can map one of the rear buttons to act as the cross button, allowing you to keep aiming or running while jumping.
This makes a big difference when playing online. With two buttons, you can map any other button you would typically need at your fingertips, like crouching, marking up enemies, or reloading. The same goes for other games like Gran Turismo 7, where one of the rear buttons can be your handbrake.
The fact that it comes with two different styles of buttons is great. I personally prefer the Lever back buttons, but some might prefer the Dome buttons. The buttons are low profile and the position of the actual buttons feels ideal for my fingers. Mapping the buttons is easy and can be done through the PS5’s on-screen settings.
Settings and Profiles

To get started with customizing your PS5 controller, you need to create and save a profile. To set it up for the first time, simply plug the controller into your PlayStation 5 using the provided USB cable. You will see a quick start guide that goes through the controller settings and features. You can tab through the screens or come back to it later.
There are two little buttons at the bottom of the controller, called the FN or function buttons. By pressing these and tapping another button on the controller, you can give those buttons multi-purposes. If you press and hold the function key, you’ll see that these four icons can be mapped to four different profiles.
The up and down buttons will also control headphone volume while the left and right buttons control the game or chat audio balance. To access the custom profile screen, press and hold the function key and the option buttons together. From there, you can create up to three custom profiles that can be saved onto the controller. You can rename them as needed.
To customize a profile, you can change the button assignments, stick sensitivity, trigger Dead Zone, vibration and trigger effect intensities. These changes will be saved onto the custom profile. To assign buttons to the back of the controller, you can assign almost any button, including icons, arrows, and triggers.
You can also change default buttons or disable buttons from working entirely. The touchpad, PlayStation options, and create buttons cannot be remapped, but you can disable them. To switch between profiles, simply press the function key along with the icon that you have mapped it to. To return to the default, non-customized profile, press the function key and triangle.
You can save up to three custom profiles on the controller and up to 30 profiles on the PS5 itself per user. When you’re ready, you can transfer profiles from the PS5 to the controller and they will show up under the unassigned profiles section.
Thumb Sticks
The thumb sticks may look normal, but they have the added bonus of being fully customizable. Firstly, the stick caps are changeable, with three pairs included: standard, high dome, and low dome. To swap them out, simply pull the current cap off, line up the new one, and push it back on until it clicks into place.

In the settings, you can change the sensitivity of the sticks, adjust the dead zone sensitivity curve, and customize the curve adjustment. To access these settings, press the function key and the option key, select the profile you wish to edit, and make adjustments while moving the sticks for instant feedback.
You can fine-tune it as you go, with the option to choose from default profiles or create your own style. You can also adjust the trigger dead zone and reduce or switch off the vibration and trigger intensity. To access these settings, press the function and option buttons together, or go to the PlayStation 5 settings and under accessories, select the DualSense Edge controller.
Additionally, the stick modules are now replaceable. Simply press the release button on the back of the controller, remove the front plate, lift the lever on each side to remove the module, slide in the new module, pull the lever down to lock it in place, and put the front cover back on. PlayStation is selling these modules for around 20 pounds, so you can easily replace them if needed.
Charging and Other Features
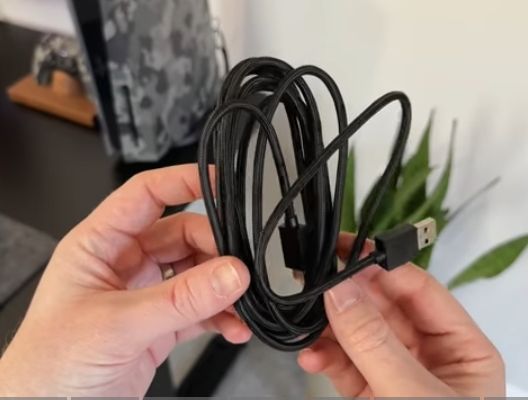
The DualSense controller comes with a 2.8 meter braided USB cable that feels premium and has a lockable connector. This feature is designed for players who use their controller wired instead of wireless, and helps keep the controller securely connected while gaming. The battery life is around 8 to 10 hours, which may vary based on usage.
The battery life is not as long as one would expect, however, the included USB cable allows for easy charging from anywhere in the house. The controller is also compatible with the original DualSense charging station.
Now, even with all these new and amazing features, we still have all the familiar features that we’ve been using for the past two years. These include haptic feedback, adaptive triggers, a built-in headphone jack, and motion controls. So we don’t have to sacrifice anything, and we still get all the new features.
Final Thoughts
But what are my overall thoughts on the new PS5 DualSense Edge controller?
Well, I like it. It feels like a nice step up from what I’ve used before. It feels weighty, premium, and includes loads of game-changing features. The only real concern could be the glossy panel and the short battery life. However, this has legitimately become my favorite controller for FPS games.
As for the price, it launches on January 26th on PlayStation’s website at £209.99 or $199.99, and it will be available at participating retailers from February 23rd. It’s not cheap by any means, but you are getting all of these awesome features that can literally change the way you play certain games, plus you’ll get a 12-month warranty.
Despite some minor drawbacks, the PS5 DualSense Edge controller delivers a premium gaming experience with amazing features and customization options.
Pros
- Premium Design and Build
- Adjustable Triggers and Mappable back buttons
- Swappable thumbsticks
Cons
- Glossy panel prone to fingerprint and scratches
- Short battery life
- Higher Price compared to standard controllers
- Design and Build9
- Adjustable Triggers9
- Remappable Buttons8
- Features9
- Battery Life7.5
- Price Point7.5